Google Flow AI Lasso Tool — Complete Guide to Editing Just One Part of Your Image 2026
You generated an image in Google Flow AI and it’s almost perfect. Almost.
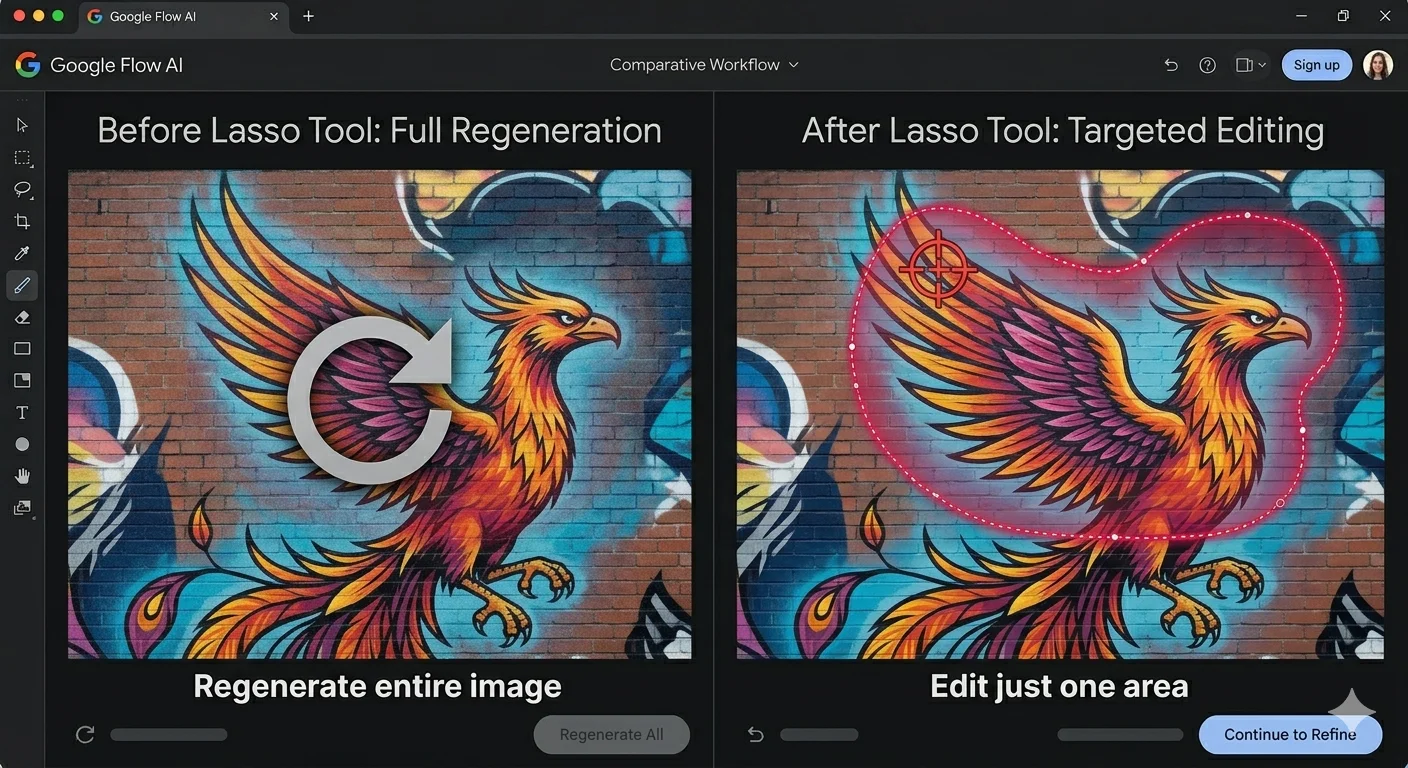
The background is wrong. Or there’s an object you don’t want. Or the lighting on just one section needs to change. Before February 2026, your only option was to write a new prompt and regenerate the entire image — and hope the parts you liked didn’t change too.
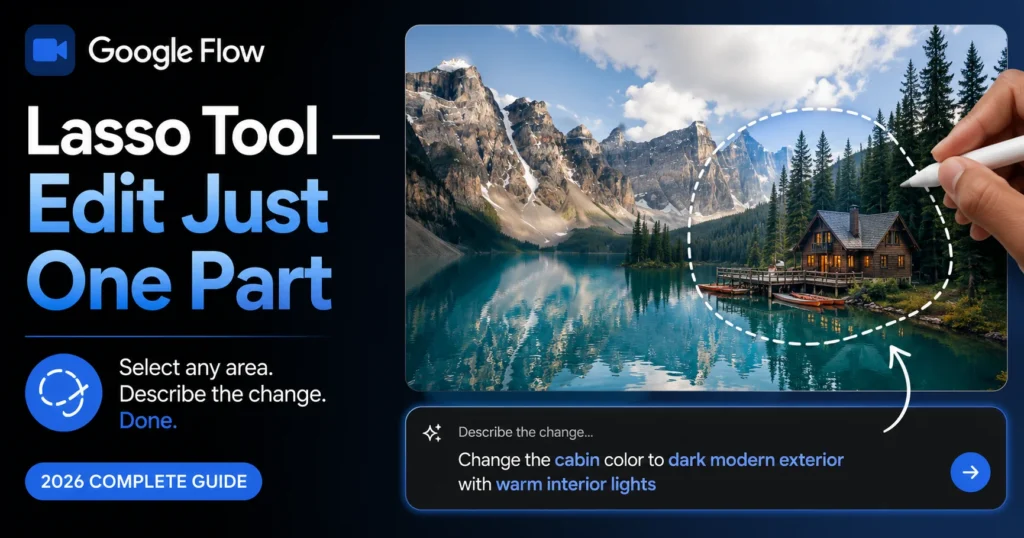
That problem is solved now. The Lasso Tool lets you draw a selection around just the part of an image you want to change, describe the change in plain language, and Flow AI updates only that area — leaving everything else exactly as it was.
This guide covers exactly what the Lasso Tool is, how it works, step-by-step instructions for using it, real examples of what to type, and how it compares to Flow AI’s other editing tools. By the end, you’ll know exactly when to reach for the Lasso Tool instead of regenerating from scratch.
What Is the Google Flow AI Lasso Tool?
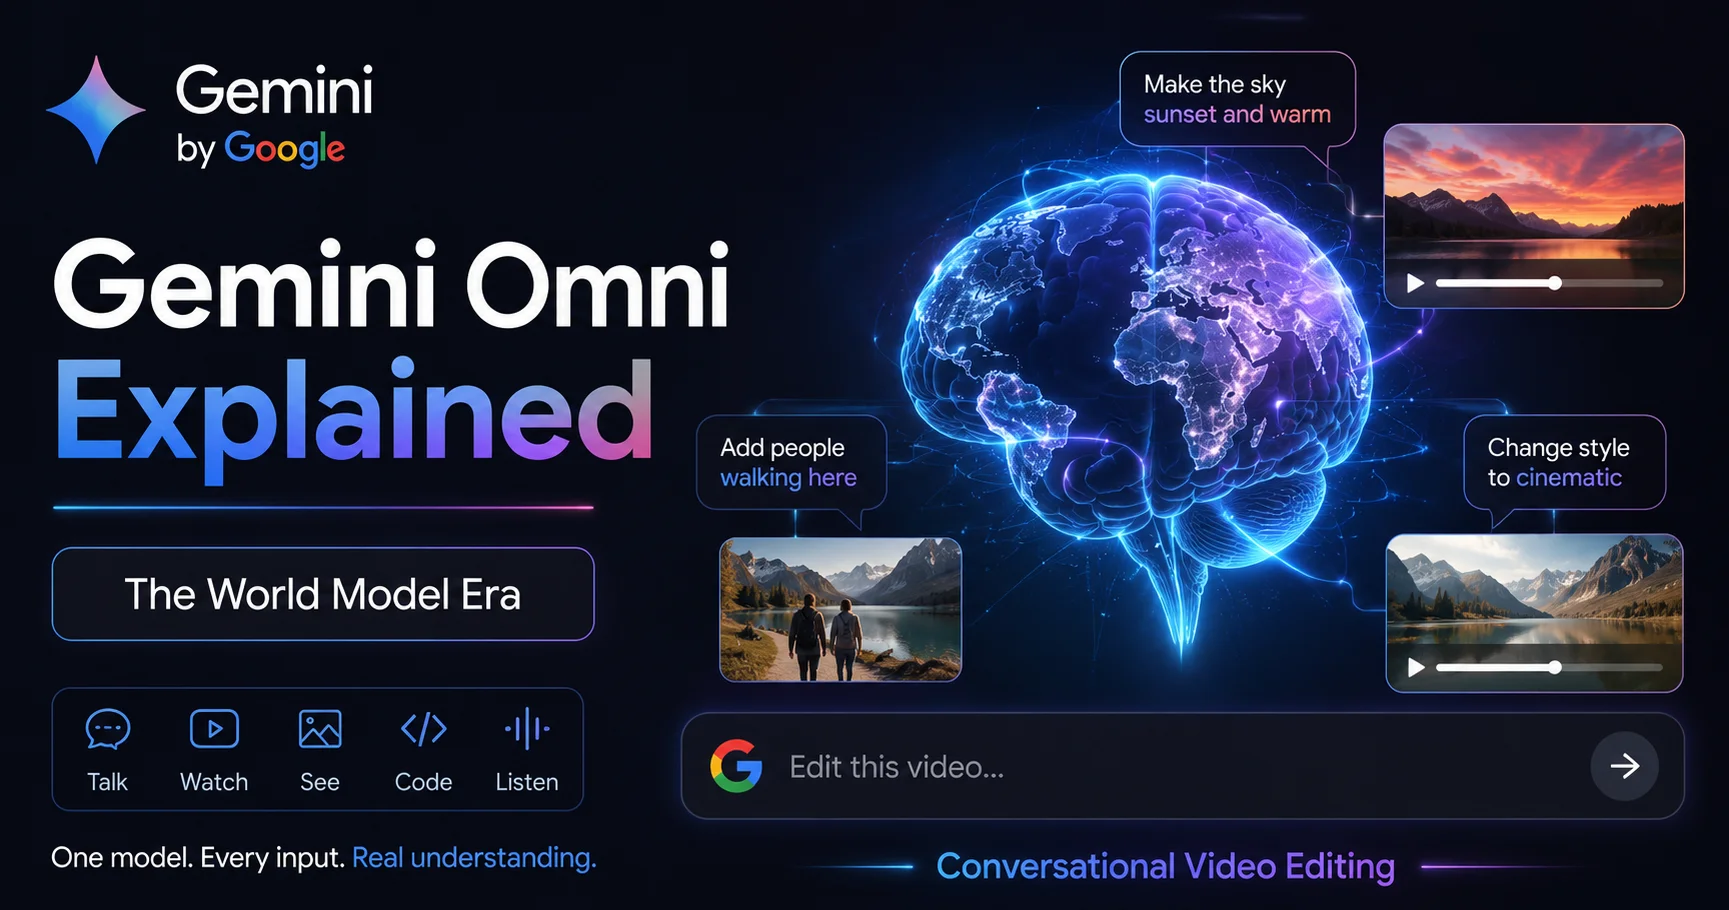
The Lasso Tool is a selective editing feature inside Google Flow AI, introduced on February 25, 2026 as part of Google’s major Flow relaunch that unified Whisk AI, ImageFX, and the original Flow video tool into one platform.
Here’s exactly what it does: you draw a freehand selection — a “lasso” — around any area of a generated image or video frame. Then you type what you want changed in that specific area, using plain everyday language. Flow AI updates only the selected region. Everything outside your lasso selection stays untouched.
Think of it like this — before the Lasso Tool, editing felt like repainting an entire wall because you didn’t like one corner. The Lasso Tool lets you touch up just that corner.
Real examples of what people use it for:
- “Remove the man” — and the person disappears, with the background filled in convincingly
- “Add koi fish in the water” — and fish appear naturally in a pond or lake in your image
- “Change the sky to sunset colors” — and just the sky transforms while the rest stays identical
- “Make this jacket red instead of blue” — and only the jacket color changes
This feature is something Whisk AI never had — it’s a genuinely new capability that arrived with the unified Flow AI platform.
Why the Lasso Tool Matters — The Problem It Solves
Before this feature existed, AI image and video generation had a frustrating limitation that every user eventually ran into.
You’d spend ten minutes crafting the perfect prompt. You’d generate an image you mostly loved. But one element was wrong — maybe a hand looked slightly off, or there was an unwanted object in the background, or the lighting on one side felt inconsistent.
Your only option was to rewrite your prompt and generate again — completely from scratch. Sometimes the new generation fixed your problem but introduced three new ones. Sometimes it looked nothing like what you had before. You were gambling with the parts that already worked just to fix the one part that didn’t.
The Lasso Tool changes this completely. Now you can:
Preserve what’s working. If 90% of your image is exactly what you wanted, you don’t have to risk it to fix the other 10%.
Make surgical, precise edits. Select exactly the pixels you want changed — nothing more, nothing less.
Iterate faster. Instead of regenerating and hoping, you’re directly telling Flow AI what specific change you want in a specific place.
Save generation credits. For video work, where each generation can use AI credits, targeted editing is far more efficient than regenerating entire clips.
How to Use the Lasso Tool — Step by Step
Here’s exactly how to use the Lasso Tool inside Google Flow AI.
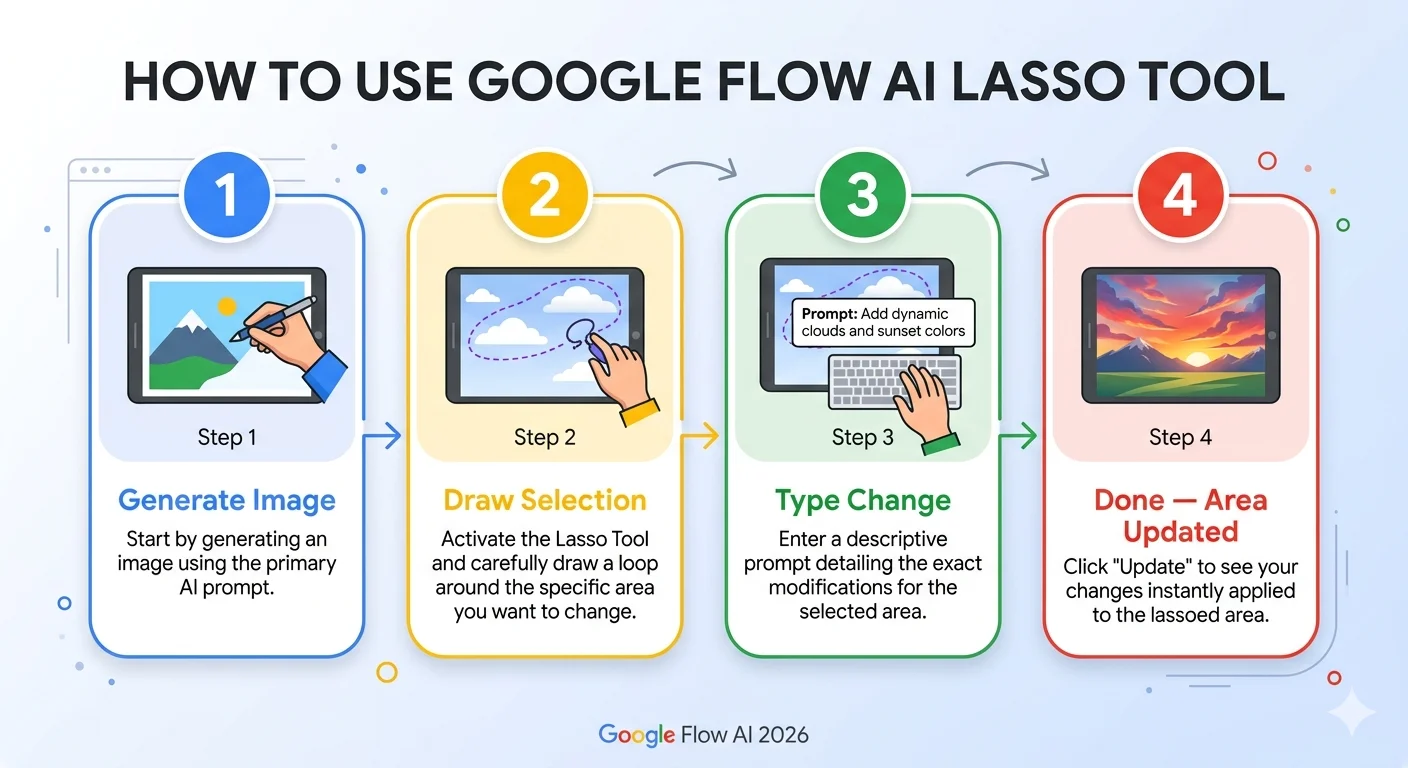
Step 1: Generate your base image or video frame
Start by generating your image or video as normal in Flow AI — either from a text prompt or using the Ingredients system. You need a finished generation to work with before you can edit it.
Step 2: Open the editing tools
With your generated image or video frame open, look for the editing tools panel. The Lasso Tool appears alongside Flow AI’s other editing options — Insert, Remove, and Extend.
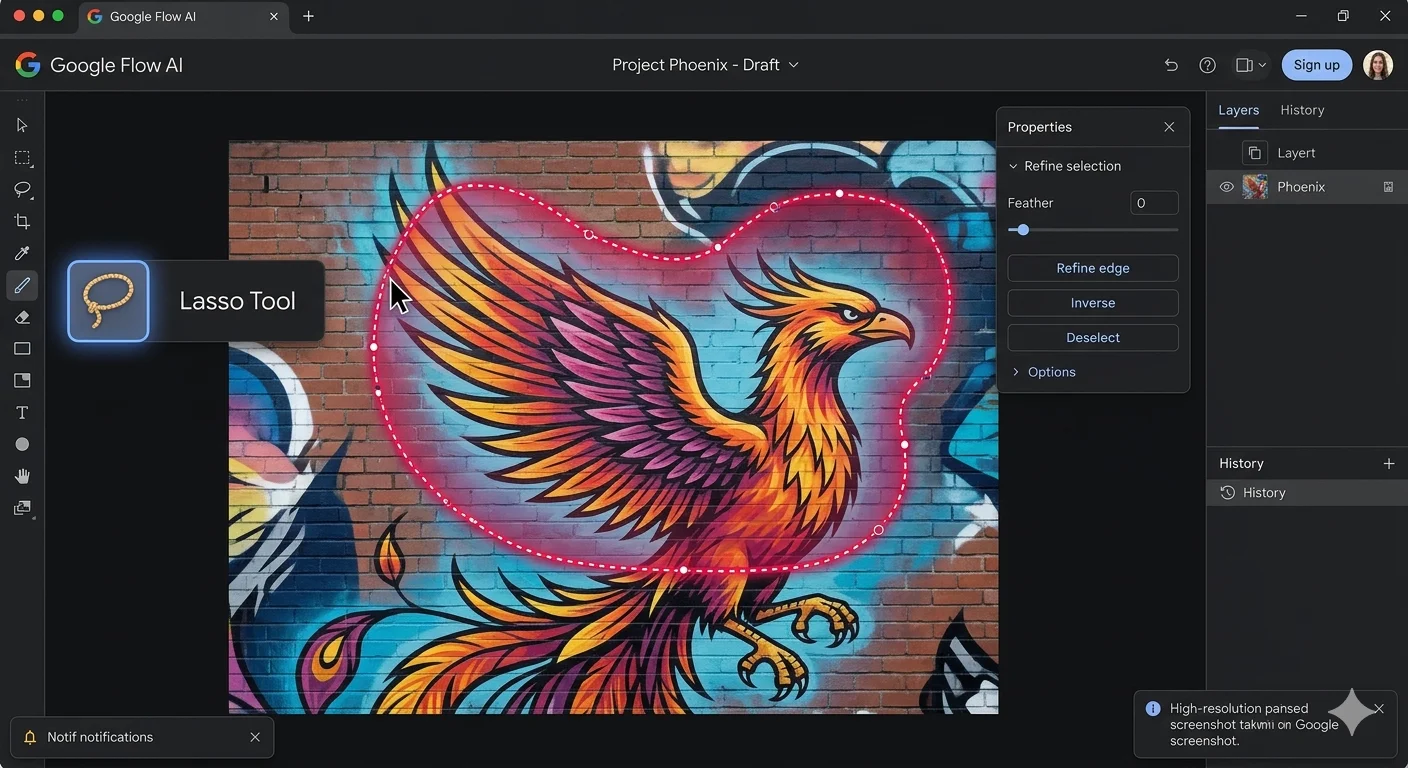
Step 3: Draw your selection
Click and drag (on desktop) or use your finger (on mobile) to draw a freehand outline around the area you want to change. You don’t need to be perfectly precise — the lasso captures the general area, and Flow AI’s AI intelligently understands the boundaries of objects within or near your selection.
Step 4: Describe the change in plain language
Once your selection is drawn, a text box appears. Type exactly what you want to happen to that selected area. Use natural, everyday language — no special syntax, no technical keywords needed. Examples:
- “Remove the person standing here”
- “Add koi fish swimming in the water”
- “Change this to a sunset sky with orange and pink clouds”
- “Make the shirt blue instead of white”
Step 5: Generate the edit
Click Generate (or the equivalent confirm button). Flow AI processes only your selected region, blending the new content seamlessly with the unchanged areas around it.
Step 6: Review and refine
Check the result. If it’s not quite right, you can lasso the same area again and refine your instruction, or try a different selection boundary.
Real Examples — What to Type and What You Get

Here are real-world examples based on Google’s own documentation and confirmed working use cases for the Lasso Tool.
Example 1 — Removing an unwanted element
You generated a peaceful park scene, but a stranger walked into frame in a way that doesn’t fit your composition.
Lasso selection: Draw around the unwanted person Text prompt: “Remove the man” Result: The person disappears, and Flow AI convincingly fills in the background — grass, path, or whatever was logically behind them — based on the surrounding context.
Example 2 — Adding an element
You have a beautiful pond scene but it feels a little empty.
Lasso selection: Draw around the water area Text prompt: “Add koi fish in the water” Result: Koi fish appear swimming naturally in the selected water area, with appropriate reflections and ripples matching the existing water texture.
Example 3 — Changing a background
Your subject looks great but the background doesn’t match the mood you’re going for.
Lasso selection: Draw around the background area (avoiding your main subject) Text prompt: “Change the background to a sunset over mountains” Result: Just the background transforms, while your subject in the foreground remains exactly as generated.
Example 4 — Color and material changes
You like the composition but want to change a specific item’s appearance.
Lasso selection: Draw around the specific clothing item or object Text prompt: “Make this jacket red leather instead of blue fabric” Result: Only the selected jacket changes — color, material texture, and all — while the person, pose, and everything else stays identical.
Example 5 — Lighting adjustments on a specific area
One part of your image has lighting that doesn’t match the rest.
Lasso selection: Draw around the inconsistently lit area Text prompt: “Add warm golden hour lighting to this area” Result: The lighting in that specific region shifts to match your description, blending naturally with the surrounding light.
Lasso Tool for Video — How It Works on Video Frames
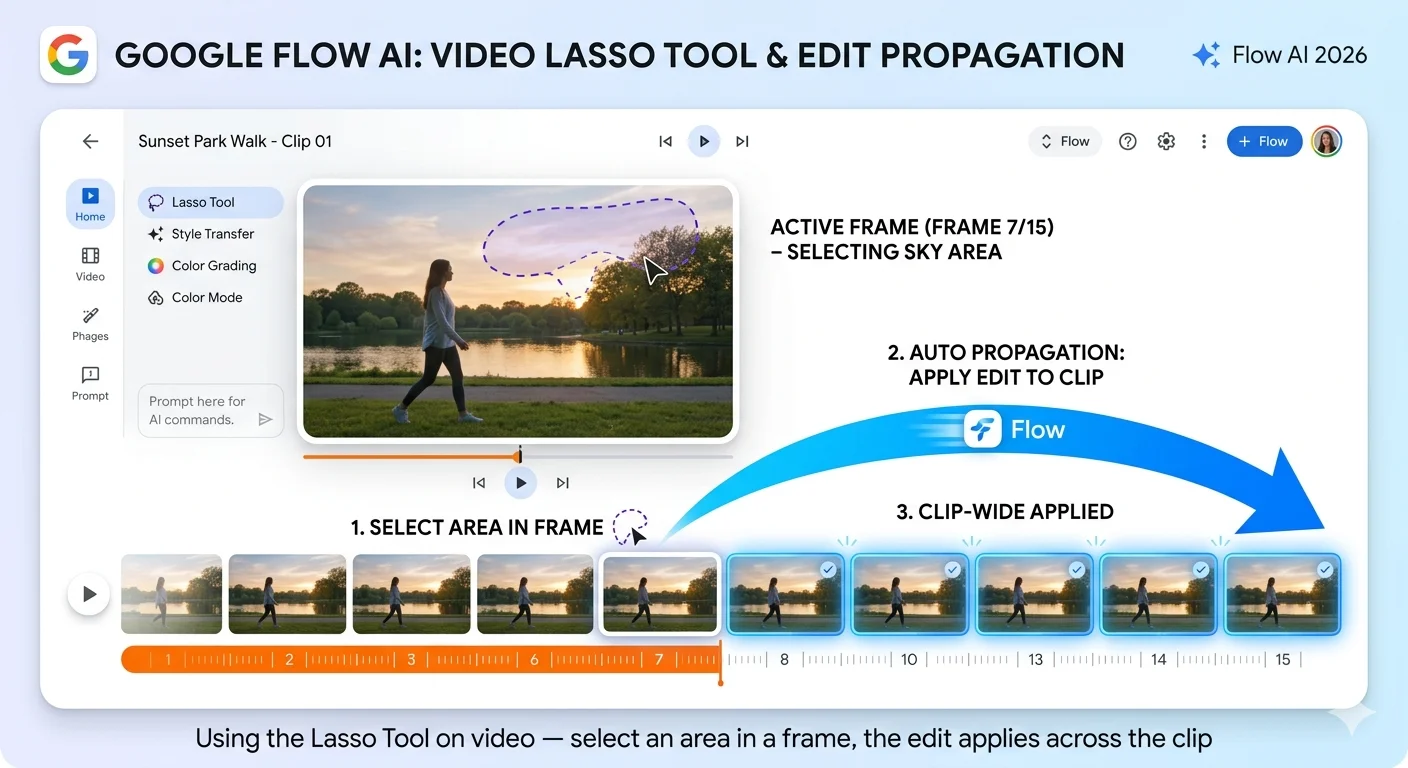
The Lasso Tool isn’t limited to still images — it works on video content too, which makes it one of the more powerful additions to Flow AI’s video editing capability.
When you apply a Lasso Tool edit to a video, Flow AI doesn’t just change a single frame — it intelligently applies your described change consistently across the relevant portion of the clip, maintaining continuity of motion, lighting, and physics.
Practical video use cases:
Removing a background distraction: If your generated video has something undesirable in the background — an object, an extra person, an inconsistency — lasso it out and describe what should be there instead. The fix applies across the duration the object appears.
Adding an element to an existing scene: Similar to the image example, you can add elements like additional characters, props, or environmental details to an already-generated video clip without re-rendering everything.
Color and style touch-ups: If a specific object’s color is wrong across your video clip, select it once and Flow AI maintains that correction throughout the clip’s motion.
This pairs naturally with Flow AI’s other video editing tools — Scene Extension and Add/Remove Object features that arrived with the Veo 3.1 update. The Lasso Tool gives you the most granular control of the set; Add/Remove Object handles more defined, whole-object changes.
Lasso Tool vs Other Flow AI Editing Tools — When to Use Which
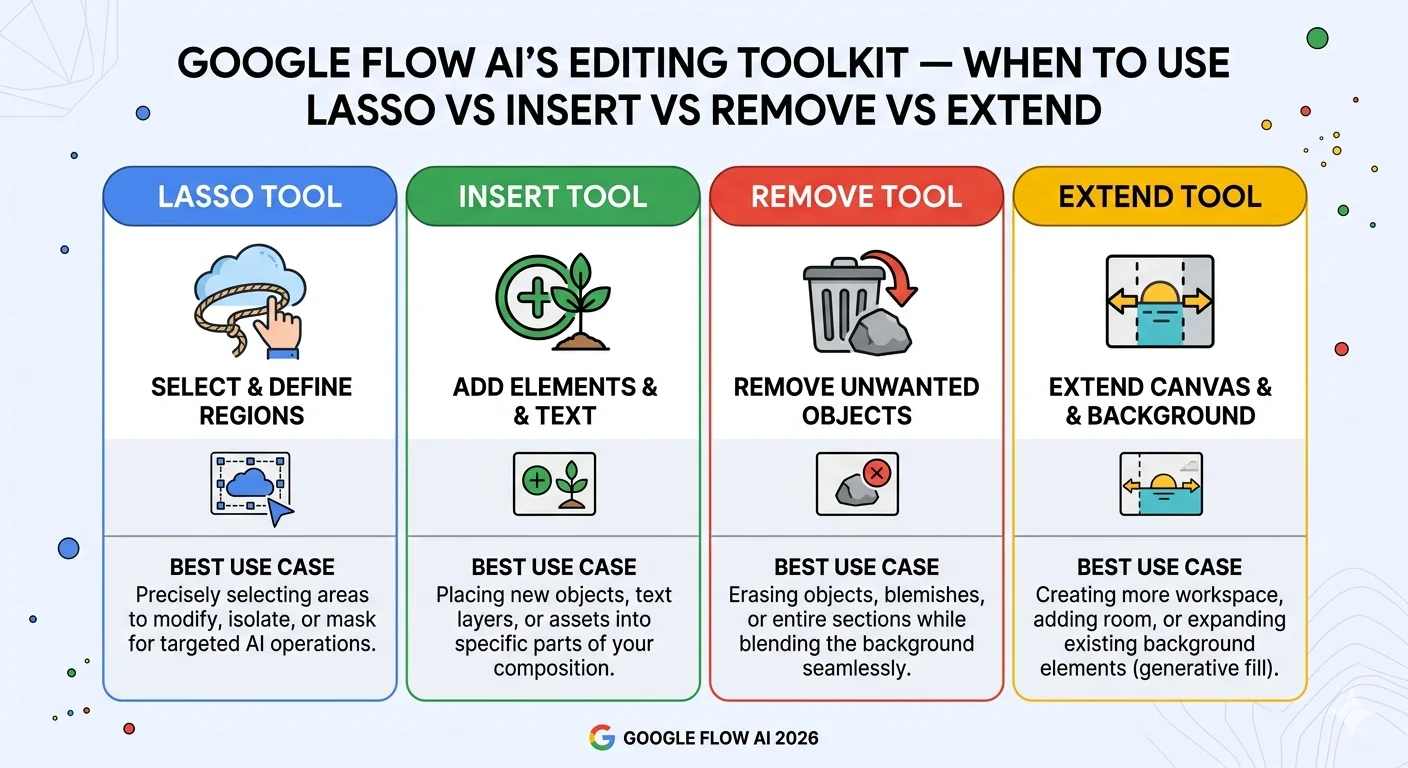
Flow AI now has several editing tools, and knowing which one to reach for saves time. Here’s the breakdown:
| Tool | What It Does | Best For |
|---|---|---|
| Lasso Tool | Freehand select any area + describe change in plain language | Precise, custom edits to specific regions — color, lighting, texture, partial changes |
| Insert | Add a whole object or character into an existing image/video | Adding clearly defined new elements (a person, an object) with auto-matched lighting and shadow |
| Remove | Remove a whole element from a scene | Cleanly deleting an unwanted subject or object, with background convincingly filled in |
| Extend | Continue a video clip beyond its original length | Making clips longer while maintaining visual continuity |
When to use the Lasso Tool specifically: Choose Lasso when your edit is about a specific area or region rather than a whole distinct object — changing a color, adjusting lighting in one part of the frame, modifying texture or material, or making any edit that doesn’t cleanly map to “add this object” or “remove this object.”
When to use Insert or Remove instead: If you’re adding or removing a clearly defined object or person — “add a dog,” “remove that car” — the dedicated Insert and Remove tools are purpose-built for exactly that and may give more reliable results for whole-object changes.
In practice, many edits work well with either approach. If Insert or Remove doesn’t give you the precision you need, the Lasso Tool’s freehand selection plus natural language description gives you more granular control.
For the complete breakdown of Flow AI’s full feature set including these editing tools, see our Google Flow AI Complete Guide.
Tips for Getting the Best Results From the Lasso Tool

1. Your selection doesn’t need to be pixel-perfect. The Lasso Tool’s underlying AI understands object boundaries intelligently. A rough selection around an object usually works as well as a precise one, since the model can distinguish the actual object edges from your loose drawing.
2. Be specific in your text description. Instead of “change this,” describe exactly what you want: “change this jacket to a deep burgundy leather texture” gives a much more predictable result than a vague instruction.
3. Select slightly beyond the object for removals. When removing something, lasso a little extra space around it rather than tracing it exactly. This gives Flow AI more context for convincingly filling in the background.
4. For color or material changes, select tightly. When you’re changing just a color or texture on an existing object — like a jacket or a wall — a tighter selection that follows the object’s actual edges produces cleaner results than a loose one.
5. Make one change at a time. If you need multiple edits in different areas, do them one lasso selection at a time rather than trying to describe several changes across different areas in one instruction. This gives you more control and makes it easier to identify which edit needs adjustment if something doesn’t look right.
6. Use it after generation, not instead of a good prompt. The Lasso Tool is for refinement, not a replacement for writing a good initial prompt. Start with the best prompt you can write using our Best Google Flow AI Prompts guide, then use the Lasso Tool to polish specific details.
How the Lasso Tool Fits Into the Full Flow AI Workflow
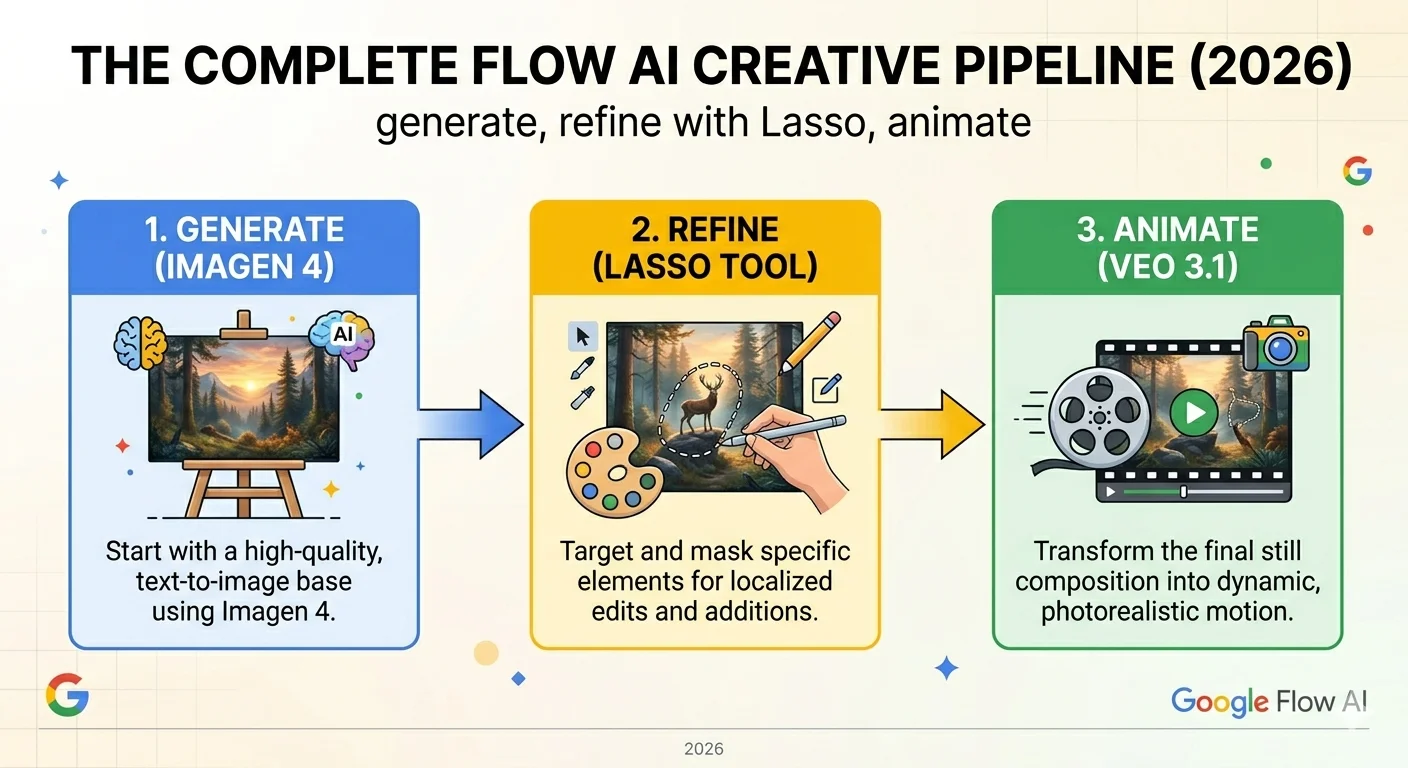
The Lasso Tool isn’t a standalone feature — it’s one part of a complete creative pipeline that Google built into the unified Flow AI platform:
Stage 1 — Generate your initial concept. Use a text prompt or the Ingredients system to create your base image using Imagen 4 (also known internally as Nano Banana).
Stage 2 — Refine with the Lasso Tool. Use the lasso to adjust specific areas — change the background, adjust lighting, add or remove elements in plain language — without touching the rest of the image.
Stage 3 — Animate with Veo. Turn your refined still image into a short video clip using Veo 3.1, adding motion, camera movement, environmental sound, and dialogue if needed.
This pipeline means you don’t have to get everything perfect in your first prompt. Generate something close, refine it precisely with the Lasso Tool, and then animate the polished result — a workflow that’s significantly more efficient than trying to nail everything in one massive prompt.
For the complete beginner walkthrough of this entire pipeline, see our Google Flow AI Tutorial.
Is the Lasso Tool Free or Does It Require a Subscription?
The Lasso Tool is available as part of Flow AI’s image editing capability. Since image generation in Flow AI is free with no daily limit, the Lasso Tool for image editing is also accessible without a paid subscription.
For video editing with the Lasso Tool — applying selective edits to video frames — this requires Google AI Plus or higher, the same as Flow AI’s other video generation and editing features (Veo 3.1, Scene Extension, Add/Remove Object).
Quick reference:
- Lasso Tool on images: ✅ Free
- Lasso Tool on video: Requires Google AI Plus ($19.99/month, approximately Rs. 1,400/month in Pakistan)
For Pakistan-specific payment details, see our Pakistan access guide.
Frequently Asked Questions
Q: What is the Google Flow AI Lasso Tool?
The Lasso Tool is a selective editing feature that lets you draw a freehand selection around any area of an image or video frame, then describe in plain language what you want changed in that specific area — without affecting the rest of the image.
Q: When did the Lasso Tool launch?
The Lasso Tool launched on February 25, 2026, as part of Google’s major Flow AI relaunch that unified Whisk AI, ImageFX, and the original Flow video tool into one platform.
Q: Is the Lasso Tool free to use?
Yes, for images. Flow AI’s image generation and editing (including the Lasso Tool) are free with no daily limit. Video editing with the Lasso Tool requires Google AI Plus.
Q: Does the Lasso Tool work on videos, not just images?
Yes. The Lasso Tool can select and edit specific areas in video frames, with the change applied consistently across the relevant portion of the clip while maintaining motion continuity.
Q: How is the Lasso Tool different from the Remove or Insert tools?
Remove and Insert are designed for whole, clearly defined objects — adding or removing a person, animal, or item. The Lasso Tool gives more granular, freehand control for edits that don’t map to a single distinct object — color changes, lighting adjustments, partial texture changes, or any custom edit to a specific region.
Q: Do I need to draw a perfect selection with the Lasso Tool?
No. Flow AI’s underlying model intelligently understands object boundaries, so a rough freehand selection usually produces good results. You don’t need pixel-perfect precision.
Q: Can I undo a Lasso Tool edit if I don’t like the result?
Yes. Flow AI keeps your generation history, so you can revert to the version before your edit, or simply lasso the same area again with a different instruction to refine further.
Q: Did Whisk AI have a Lasso Tool?
No. The Lasso Tool is a feature exclusive to the unified Google Flow AI platform that launched in February 2026. It did not exist in the original Whisk AI tool.
Q: What should I type when using the Lasso Tool?
Use plain, natural language describing exactly what you want in the selected area. Examples: “remove the man,” “add koi fish in the water,” “change this to a sunset sky,” “make this jacket red.” Avoid vague instructions — specificity produces more predictable results.
Final Thoughts — Stop Regenerating, Start Refining
The Lasso Tool represents a real shift in how AI image and video editing works. Instead of treating every imperfection as a reason to start over, you can now treat your generations as a starting point — something to be refined, polished, and perfected piece by piece.
This matters more than it might initially seem. The frustration of losing a great generation because of one small flaw was one of the most common complaints about AI creative tools before tools like this existed. The Lasso Tool removes that frustration entirely.
Next time you generate something in Google Flow AI that’s 90% right, don’t hit regenerate. Draw a lasso around the 10% that’s wrong, describe what you want instead, and watch it update — with everything else staying exactly as you liked it.
For everything else Flow AI can do — from Veo 3.1’s audio generation to the Ingredients to Video system to Gemini Avatar — visit WhiskAILabs for the complete guide library.
Related Articles on WhiskAILabs:
- Home — WhiskAILabs.net
- Google Flow AI Complete Guide 2026
- What Is Google Flow AI?
- Google Flow AI Tutorial — Step by Step
- Veo 3.1 Update 2026 — All New Features
- Ingredients to Video with Audio Guide
- Gemini Avatar in Google Flow AI
- Google Labs AI Tools 2026
- What Is Google Whisk AI?
- Best Google Flow AI Prompts 2026
- Google Flow AI Pricing 2026
- Google Flow Beta Download Guide
- Pakistan Access Guide for Google AI
- News & Updates — WhiskAILabs
Official External Sources:
- Google Flow AI — flow.google
- Google Blog: Flow Updates February 2026
- Google Labs — labs.google
- Google DeepMind — deepmind.google

AI tools researcher aur content creator hoon. Google Whisk AI, Google Flow AI aur image generation tools par actively kaam karta hoon. WhiskAILabs.net ka founder hoon jahan AI tools ko simple aur asaan andaaz mein explain kiya jata hai.